 These are a few of my favorite things
The Small Stuff
These are a few of my favorite things
The Small Stuff

 To show all the "little stuff"
would take many pictures and likely bore the reader. These pictures
above do show a few things in my basement. The picture on the
left is a bit of an overall shot and shows my hardwood stock pile
(maple, birch, cherry, walnut etc) and a storage bench. In front
of that are some reject table legs, some steam bending forms and
even an antique double chamber set of blacksmith bellows. My mill/drill
is on the left. The picture on the right shows a bit of detail.
You can see up top are some MT drills, involute gear cutters,
R8 collets, a boring head while down below are a pair of dividing
heads with tailstocks, milling cutters, a center finder etc etc
while the blue thing in the back is a magnetics winder (a lovely
machine that was given to me). It's like a lathe except you dial
up the number of turns and the machine will automatically brake
when the number of turns has been complete. This will come in
handy when I do the coils on my Foucault Pendulum.
To show all the "little stuff"
would take many pictures and likely bore the reader. These pictures
above do show a few things in my basement. The picture on the
left is a bit of an overall shot and shows my hardwood stock pile
(maple, birch, cherry, walnut etc) and a storage bench. In front
of that are some reject table legs, some steam bending forms and
even an antique double chamber set of blacksmith bellows. My mill/drill
is on the left. The picture on the right shows a bit of detail.
You can see up top are some MT drills, involute gear cutters,
R8 collets, a boring head while down below are a pair of dividing
heads with tailstocks, milling cutters, a center finder etc etc
while the blue thing in the back is a magnetics winder (a lovely
machine that was given to me). It's like a lathe except you dial
up the number of turns and the machine will automatically brake
when the number of turns has been complete. This will come in
handy when I do the coils on my Foucault Pendulum.
Ye Olde 10" Table Saw (This saw is now
retired and given to my brother)

Ye New 12" Table Saw 

 This is the replacement for the saw
above. Ye olde saw above threw the gear again (likely the 3HP motor
was too much for it) so I gave it to my brother. This one is truly
3HP with a nice 12" blade (4" depth of cut). On assembling
it I noticed the internal wiring was smallish for my liking so
when hooking up the cord I re-wired it with #10AWG everywhere.
I also outdid myself on the rolling mobile base for it (another MIG
project) when I added the router table to it. Most of my moderately sized equipment is mounted
on casters so as to allow for compact storage. To work with one
I simply pull it out onto the driveway. After use it is cleaned
up and wheeled back to it's parking spot in the garage. This machine however
is now approaching a car length!
I obtained a Craftex router table
and, in order to save space, discarded it's stand and mounted it between the fence guides like
my old saw used to have. I can now use my Bosch "3HP"
variable speed plunge router again. The top flips up for router access. The back 1/2 of the top is cast iron
while the front half is an aluminum extrusion on slides so it can slide back and forth. I made
provision for the router table to be mounted to a second higher position if I want to slide the
router table *both* ways. Otherwise I leave it where it is and just remove the Porter Cable dovetail
jig for sliding one direction which covers 95% of what I'll be doing. In future I may add a Pin Router Arm
to it and have left space at the back for this. I made the dovetail jig
mount so that a top-clamped board sits flat on the table top.
I retained all my other accessories
(Lee Valley "Accu-Miter", router bits, mortising attachment
etc etc) for use on this saw. Like the jointer below it has a commanding sound when running
and will cut anything effortlessly.
This is the replacement for the saw
above. Ye olde saw above threw the gear again (likely the 3HP motor
was too much for it) so I gave it to my brother. This one is truly
3HP with a nice 12" blade (4" depth of cut). On assembling
it I noticed the internal wiring was smallish for my liking so
when hooking up the cord I re-wired it with #10AWG everywhere.
I also outdid myself on the rolling mobile base for it (another MIG
project) when I added the router table to it. Most of my moderately sized equipment is mounted
on casters so as to allow for compact storage. To work with one
I simply pull it out onto the driveway. After use it is cleaned
up and wheeled back to it's parking spot in the garage. This machine however
is now approaching a car length!
I obtained a Craftex router table
and, in order to save space, discarded it's stand and mounted it between the fence guides like
my old saw used to have. I can now use my Bosch "3HP"
variable speed plunge router again. The top flips up for router access. The back 1/2 of the top is cast iron
while the front half is an aluminum extrusion on slides so it can slide back and forth. I made
provision for the router table to be mounted to a second higher position if I want to slide the
router table *both* ways. Otherwise I leave it where it is and just remove the Porter Cable dovetail
jig for sliding one direction which covers 95% of what I'll be doing. In future I may add a Pin Router Arm
to it and have left space at the back for this. I made the dovetail jig
mount so that a top-clamped board sits flat on the table top.
I retained all my other accessories
(Lee Valley "Accu-Miter", router bits, mortising attachment
etc etc) for use on this saw. Like the jointer below it has a commanding sound when running
and will cut anything effortlessly.
The Jointer
 This 12" General jointer is from
the NRC (National Research Council). To my way
of thinking you really want a big jointer since coming across
wide boards greater than 8" is a fairly common occurrence.
This 3HP machine even sounds "industrial". Notice that
each of the tables are fully supported and will not sag with time.
Quality like this is hard to find today. I have it on casters
but it's still a chore to push as those casters are at close to
their limit under the weight of this 700+lb machine.
I use the dial gauge (and the big hand
wheel) to set the depth of cut. I nearly always set that to 1/16"
but the machine can easily cut anything you can push through.
The only down side to this machine is the incredible amount of
shavings it can produce in no time flat. I really need to find
somebody who has a pet rabbit.
This 12" General jointer is from
the NRC (National Research Council). To my way
of thinking you really want a big jointer since coming across
wide boards greater than 8" is a fairly common occurrence.
This 3HP machine even sounds "industrial". Notice that
each of the tables are fully supported and will not sag with time.
Quality like this is hard to find today. I have it on casters
but it's still a chore to push as those casters are at close to
their limit under the weight of this 700+lb machine.
I use the dial gauge (and the big hand
wheel) to set the depth of cut. I nearly always set that to 1/16"
but the machine can easily cut anything you can push through.
The only down side to this machine is the incredible amount of
shavings it can produce in no time flat. I really need to find
somebody who has a pet rabbit.
The Planer

 This is a 20" "Craftex?".
Ya, I know, I really wanted to get a General planer to go with
my jointer but they are getting to be prohibitively expensive
these days. Since there were many jobs I had done that needed
more than 16" I went for a 20" machine.
I had previously used one of those
portable 12" planers but when doing serious work the thermal
protector operates stopping the machine. I got tired of sitting
on a pile of wood watching dusk approach as I waited for the machine
to cool for the umpteenth time. They're OK if you are doing small
amounts but I often plane a couple hundred board feet at a time.
This new one has a big 3HP induction motor that will work (much
harder) all day long. The shaving pile produced by the jointer
above is only surpassed by this machine. Typically after a run
I'll have a conical pile about 4ft high. I always find this sobering
after having spent so much money for the wood going through it.
The stainless-topped infeed and outfeed
tables are my own making. I made them because I didn't like the
fragile stock roller arrangement and also to minimize "snipe"
on long boards. They work very well. The mobile base is also my
own making and allows for effortless moving of the planer out
to the driveway where I plane (easier to clean up that shaving
pile).
This is a 20" "Craftex?".
Ya, I know, I really wanted to get a General planer to go with
my jointer but they are getting to be prohibitively expensive
these days. Since there were many jobs I had done that needed
more than 16" I went for a 20" machine.
I had previously used one of those
portable 12" planers but when doing serious work the thermal
protector operates stopping the machine. I got tired of sitting
on a pile of wood watching dusk approach as I waited for the machine
to cool for the umpteenth time. They're OK if you are doing small
amounts but I often plane a couple hundred board feet at a time.
This new one has a big 3HP induction motor that will work (much
harder) all day long. The shaving pile produced by the jointer
above is only surpassed by this machine. Typically after a run
I'll have a conical pile about 4ft high. I always find this sobering
after having spent so much money for the wood going through it.
The stainless-topped infeed and outfeed
tables are my own making. I made them because I didn't like the
fragile stock roller arrangement and also to minimize "snipe"
on long boards. They work very well. The mobile base is also my
own making and allows for effortless moving of the planer out
to the driveway where I plane (easier to clean up that shaving
pile).
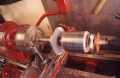
My 14 1/2" South Bend Lathe
 Of all my machines this is one of my
two favorites. I simply love this lathe. It's old ("conforms
to the war production board"), it's tired, yet it continues
to execute all work wonderfully. All I know of it's history was
that it was Lee Valley's original prototype lathe. Why
did I get a lathe so big? Well I wanted a metal lathe yet still
wanted to occasionally turn wood (typically bigger objects) and
when I bumped into this for the price of a wood lathe it was sold.
Of all my machines this is one of my
two favorites. I simply love this lathe. It's old ("conforms
to the war production board"), it's tired, yet it continues
to execute all work wonderfully. All I know of it's history was
that it was Lee Valley's original prototype lathe. Why
did I get a lathe so big? Well I wanted a metal lathe yet still
wanted to occasionally turn wood (typically bigger objects) and
when I bumped into this for the price of a wood lathe it was sold.

 The picture above left shows it being
delivered several days after I bought it. The view is of the back
side of the lathe. I was smart enough to get delivery included
for the buying price. Having already bought a few big machines
I know that this is often easy for the seller in the business
but can be expensive otherwise. His buddy delivered it in a 1
ton "dually" while he drove up the street with the forklift
(he happened to be in the area with it anyway). It was set in
the garage and using pipes as rollers it was simply pushed into
place. The middle picture shows it as it is presently set-up looking
towards the headstock. The right picture is similar but viewing
towards the tailstock. It was originally 600V 3 phase and I converted
it to 220V single phase. Despite it's size its only 1.5HP and
power has never been an issue.
The picture above left shows it being
delivered several days after I bought it. The view is of the back
side of the lathe. I was smart enough to get delivery included
for the buying price. Having already bought a few big machines
I know that this is often easy for the seller in the business
but can be expensive otherwise. His buddy delivered it in a 1
ton "dually" while he drove up the street with the forklift
(he happened to be in the area with it anyway). It was set in
the garage and using pipes as rollers it was simply pushed into
place. The middle picture shows it as it is presently set-up looking
towards the headstock. The right picture is similar but viewing
towards the tailstock. It was originally 600V 3 phase and I converted
it to 220V single phase. Despite it's size its only 1.5HP and
power has never been an issue.

 It also came with a taper turning attachment,
4 chucks (inner and outer 3 & 4 jaw chucks), carriage stop,
faceplates. a set of collets with rack, work supports and a myriad
of other accessories as can be seen in the pictures. I have also
since obtained boring bars, a large Jacobs 3 jaw chuck, knurling
tools, live center, expanding arbors, MT drills up to 1"
etc. I also recently made a 2 1/2" spherical cutting attachment for it which
works very well. Because it is stored in the garage I also made
a denim cover for it to keep the dust off it when not in use.
It also came with a taper turning attachment,
4 chucks (inner and outer 3 & 4 jaw chucks), carriage stop,
faceplates. a set of collets with rack, work supports and a myriad
of other accessories as can be seen in the pictures. I have also
since obtained boring bars, a large Jacobs 3 jaw chuck, knurling
tools, live center, expanding arbors, MT drills up to 1"
etc. I also recently made a 2 1/2" spherical cutting attachment for it which
works very well. Because it is stored in the garage I also made
a denim cover for it to keep the dust off it when not in use.
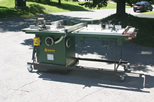
My 5HP DC (Variable Speed) 36"
Oliver Bandsaw
 That's right 5HP, 36". This is
my other favorite machine. Made by The Oliver Machinery Co. of
Grand Rapids Michigan. I bumped into the ad for it in rec.crafts.woodworking
the early days of the internet. It was to be 3HP but the guy said
for an extra $100 he'd upgrade it to 5HP (he worked at GE). We
drove over 1000mi round trip in a snow storm to get it and when
we got home realized there was no way to lift the 2500 lb frame
off the trailer. Having already taken a day off work and having
to get the trailer back the next day there was only one option.
Ottawa Crane Rentals. $70/hr 3 hr minimum.
That's right 5HP, 36". This is
my other favorite machine. Made by The Oliver Machinery Co. of
Grand Rapids Michigan. I bumped into the ad for it in rec.crafts.woodworking
the early days of the internet. It was to be 3HP but the guy said
for an extra $100 he'd upgrade it to 5HP (he worked at GE). We
drove over 1000mi round trip in a snow storm to get it and when
we got home realized there was no way to lift the 2500 lb frame
off the trailer. Having already taken a day off work and having
to get the trailer back the next day there was only one option.
Ottawa Crane Rentals. $70/hr 3 hr minimum.

 When the 18 wheeler sized crane pulled
up (above) I got nervous. He placed one support leg down next
to my neighbor's house and the other in the middle of my yard.
When he fired up the auxiliary engine and raised the massive boom
within inches of my neighbor's roof I was sure my hobbies were
out of control. Yessiree heads were poking out the front doors
all the way up and down the street on this one. He actually managed
to set it 1/2 way into the garage.
The beauty of this saw is that it does
metal or wood with a simple blade change. One simply changes the
blade and turns the dial to a different speed. The down side is
that the blades are 20ft so you have to buy the blades in 100ft
rolls and weld them up. Since I don't have a blade welder I have
been getting them done (self serve) at sympathetic machine shops.
Mostly the metal blade stays on and I've found that Starrett bi-metal
blades are the best bang for the buck.
When you first plug it in the an AC
blower starts up to cool the DC motor. Unlike a geared down AC
motor which can rely on its rotational speed for cooling the DC
motor can slow to near zero and so relies on the blower for cooling.
The controls consist of a forward/reverse switch and a dial for
setting the speed and a start & stop button. It couldn't be
more convenient. The 36 1/2" capacity of this saw is amazing.
It can resaw up to 20" although I'm currently limited to
about 11" before the guide boom hits the roof.
When the 18 wheeler sized crane pulled
up (above) I got nervous. He placed one support leg down next
to my neighbor's house and the other in the middle of my yard.
When he fired up the auxiliary engine and raised the massive boom
within inches of my neighbor's roof I was sure my hobbies were
out of control. Yessiree heads were poking out the front doors
all the way up and down the street on this one. He actually managed
to set it 1/2 way into the garage.
The beauty of this saw is that it does
metal or wood with a simple blade change. One simply changes the
blade and turns the dial to a different speed. The down side is
that the blades are 20ft so you have to buy the blades in 100ft
rolls and weld them up. Since I don't have a blade welder I have
been getting them done (self serve) at sympathetic machine shops.
Mostly the metal blade stays on and I've found that Starrett bi-metal
blades are the best bang for the buck.
When you first plug it in the an AC
blower starts up to cool the DC motor. Unlike a geared down AC
motor which can rely on its rotational speed for cooling the DC
motor can slow to near zero and so relies on the blower for cooling.
The controls consist of a forward/reverse switch and a dial for
setting the speed and a start & stop button. It couldn't be
more convenient. The 36 1/2" capacity of this saw is amazing.
It can resaw up to 20" although I'm currently limited to
about 11" before the guide boom hits the roof.

 I also made a removable circle cutting
attachment for it which will allow me to cut circles from about
1" up to about 10ft. The attachment can also pivot with the
tilting table allowing me to cut tapered plugs. The 3/8"
pivot pin is replaceable by loosening a hex socket set screw.
To make a pivot of different diameter I would simply turn a 3/4"
piece of steel (about 1" long) to the desired diameter for
1/2 the 1" length, insert it and lock it in place.
Due to it's very size it's hard to
take pictures of this saw and get it all in. I did put my Starrett
24" square on the table in the pictures above to give a sense
of scale.
Every time I use this saw I walk away
smiling. It is a wonderful machine!
I also made a removable circle cutting
attachment for it which will allow me to cut circles from about
1" up to about 10ft. The attachment can also pivot with the
tilting table allowing me to cut tapered plugs. The 3/8"
pivot pin is replaceable by loosening a hex socket set screw.
To make a pivot of different diameter I would simply turn a 3/4"
piece of steel (about 1" long) to the desired diameter for
1/2 the 1" length, insert it and lock it in place.
Due to it's very size it's hard to
take pictures of this saw and get it all in. I did put my Starrett
24" square on the table in the pictures above to give a sense
of scale.
Every time I use this saw I walk away
smiling. It is a wonderful machine!
The "Mill" Drill
 I purchased this machine early on just
starting out and, after having bought it, realized all it's pitfalls.
Note how the spindle is held. Hold your arm as stiff as you can
straight out in front of you. Get someone else to put a gentle
sideways push on your hand and see if you can resist it. That's
the problem with this machine. It's a great drill press and OK
with light machining but every time I want to machine steel I
grit my teeth. It'll do it but forget speed with accuracy. On
a related note I have removed the top pulley cover because it
had a tendency to rattle when the machine was loaded.
I have added an auto feed to the longitudinal
feed. I also installed an auxiliary 110V power outlet on the rear
and an operational light that illuminates the area below the chuck.
The original vise was a complete joke and I have since replaced
it with a large 6" machining vise. Also replaced was the
original el-cheapo 3 jaw chuck. I have also replaced the two large
clamping bolts at the back of the head as the original ones were
made of terrible steel and kept galling, preventing the proper
securing of the head. In terms of accessories I have have obtained
a more or less complete set of R8 spindles for end-mills, chucks,
MT drills, gear cutters, boring head etc.
If you are reading this in terms of
deciding on equipment I would hope that unless you only plan to
do drilling and light machining of wood you learn from my mistake
and steer yourself towards a Bridgeport type mill. When you look
at a machine like that note how the head is supported and how
the table etc is held close to the machine and on dovetail ways.
I once heard a fellow hobbyist describe machining to me as like
trying to hold a slippery fish. If you can hold it the rest is
easy. A rigid machine is 90% of the battle. This is why serious
equipment is big and heavy. Unfortunately this machine lacks those
traits.
Having said all the above I have done
many things on this machine that I otherwise couldn't do.
I purchased this machine early on just
starting out and, after having bought it, realized all it's pitfalls.
Note how the spindle is held. Hold your arm as stiff as you can
straight out in front of you. Get someone else to put a gentle
sideways push on your hand and see if you can resist it. That's
the problem with this machine. It's a great drill press and OK
with light machining but every time I want to machine steel I
grit my teeth. It'll do it but forget speed with accuracy. On
a related note I have removed the top pulley cover because it
had a tendency to rattle when the machine was loaded.
I have added an auto feed to the longitudinal
feed. I also installed an auxiliary 110V power outlet on the rear
and an operational light that illuminates the area below the chuck.
The original vise was a complete joke and I have since replaced
it with a large 6" machining vise. Also replaced was the
original el-cheapo 3 jaw chuck. I have also replaced the two large
clamping bolts at the back of the head as the original ones were
made of terrible steel and kept galling, preventing the proper
securing of the head. In terms of accessories I have have obtained
a more or less complete set of R8 spindles for end-mills, chucks,
MT drills, gear cutters, boring head etc.
If you are reading this in terms of
deciding on equipment I would hope that unless you only plan to
do drilling and light machining of wood you learn from my mistake
and steer yourself towards a Bridgeport type mill. When you look
at a machine like that note how the head is supported and how
the table etc is held close to the machine and on dovetail ways.
I once heard a fellow hobbyist describe machining to me as like
trying to hold a slippery fish. If you can hold it the rest is
easy. A rigid machine is 90% of the battle. This is why serious
equipment is big and heavy. Unfortunately this machine lacks those
traits.
Having said all the above I have done
many things on this machine that I otherwise couldn't do.
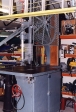
My Kent Vertical Mill
 I just bought this mill May 29/03.
One of the big selling features to me was the included Acu-Rite
two axis DRO (Digital Read Out) and that it is a serious
mill. Additionally it uses R8 tooling and I have a lot invested
in that (see very top right picture for some of it) for use on
the mill/drill above. All that investment can be used on this
new machine. The motor was a 3HP 575V 3 phase but I swapped in
a 220V single phase motor. I also put another Mititoyo DRO on the quill. It is so nice to know where
the table actually is and not have to factor soft dial backlash.
Below are some pictures of the delivery.
*This* is the way to move a big machine!
I just bought this mill May 29/03.
One of the big selling features to me was the included Acu-Rite
two axis DRO (Digital Read Out) and that it is a serious
mill. Additionally it uses R8 tooling and I have a lot invested
in that (see very top right picture for some of it) for use on
the mill/drill above. All that investment can be used on this
new machine. The motor was a 3HP 575V 3 phase but I swapped in
a 220V single phase motor. I also put another Mititoyo DRO on the quill. It is so nice to know where
the table actually is and not have to factor soft dial backlash.
Below are some pictures of the delivery.
*This* is the way to move a big machine!

 He (Alex) simply jiggered it out of
the truck and onto the 10ft hydraulic gate, lowered it, and jiggered
it into the garage. Easy as pie. If I ever move I'm going to hire
this guy! I had previously removed the motor to ease entry into
the garage but it still *just* made it.
Below is my single phase conversion.
I bought a brand new 240V 3HP Baldor C-face motor. On the left
is some shaft customization. The shaft had to be reduced from
1" to 7/8" diameter where the pulley would be. It also
had to be shortened in length. The mounting plate had to be cut
off with an angle grinder too as this was going to be vertical
mount. All this was a little nerve racking. A brand new $700 motor,
never run and I'm cutting it all up. The picture on the right
shows the completed motor with its new sliding baseplate I made.
This was all custom painted to match the rest of the mill. The
old 575V 3 phase motor can be seen in the background (I have now
set it aside, unaltered as an alternate powering option) just
behind the step pulley.
He (Alex) simply jiggered it out of
the truck and onto the 10ft hydraulic gate, lowered it, and jiggered
it into the garage. Easy as pie. If I ever move I'm going to hire
this guy! I had previously removed the motor to ease entry into
the garage but it still *just* made it.
Below is my single phase conversion.
I bought a brand new 240V 3HP Baldor C-face motor. On the left
is some shaft customization. The shaft had to be reduced from
1" to 7/8" diameter where the pulley would be. It also
had to be shortened in length. The mounting plate had to be cut
off with an angle grinder too as this was going to be vertical
mount. All this was a little nerve racking. A brand new $700 motor,
never run and I'm cutting it all up. The picture on the right
shows the completed motor with its new sliding baseplate I made.
This was all custom painted to match the rest of the mill. The
old 575V 3 phase motor can be seen in the background (I have now
set it aside, unaltered as an alternate powering option) just
behind the step pulley.
 Below it is all back together and now
running. The picture was taken while I was transferring some tooling
up from my mill
drill and shows a pair of dividing heads and some chucks on
the table. Other tooling can be seen on the home made shelf to
the right.
Below it is all back together and now
running. The picture was taken while I was transferring some tooling
up from my mill
drill and shows a pair of dividing heads and some chucks on
the table. Other tooling can be seen on the home made shelf to
the right.

The 12" Hendy Shaper
 Another NRC machine. I bought this
old bugger for $600. How old? The motor data plate had the 25Hz
over-stamped and 60Hz stamped above it. It may be old but the
hand scraping marks are still very evident on the dovetail ways.
This machine was 2HP, 600V 3 phase but a gear motor. Not wanting
to make a unique exception to rotary phase converter free garage
I opted to get it rewound to 220V single phase and add the capacitor
start / centrifugal switch myself. This is not a job for the faint
of heart and is a fairly involved process.
The picture above shows us all unloading
it. A snow flurry started in the middle of the process. You can
see that two 2 x 8s were braced across the front of the trailer,
about a 6ft span. A chain was looped around them and some cable
come-alongs were used between the chain-loop and the machine to
lower it off the tilted trailer. I should note at this point that
this machine is massively heavy. In the photo above the we were
unable to lower (flatten) the hydraulic tilt bed trailer with
the machine in the position shown. We wanted to do that because
the two 2 x 8s were "wowing" dangerously. In the end
we were stuck and about 2 minutes after this picture was taken
the two 2 x 8's snapped like matchsticks and the machine slid
off the back of the snow covered metal topped trailer (landing
upright, whew). Luckily no one was killed but I learned then and
there that when moving heavy machinery you should be properly
prepared.
Another NRC machine. I bought this
old bugger for $600. How old? The motor data plate had the 25Hz
over-stamped and 60Hz stamped above it. It may be old but the
hand scraping marks are still very evident on the dovetail ways.
This machine was 2HP, 600V 3 phase but a gear motor. Not wanting
to make a unique exception to rotary phase converter free garage
I opted to get it rewound to 220V single phase and add the capacitor
start / centrifugal switch myself. This is not a job for the faint
of heart and is a fairly involved process.
The picture above shows us all unloading
it. A snow flurry started in the middle of the process. You can
see that two 2 x 8s were braced across the front of the trailer,
about a 6ft span. A chain was looped around them and some cable
come-alongs were used between the chain-loop and the machine to
lower it off the tilted trailer. I should note at this point that
this machine is massively heavy. In the photo above the we were
unable to lower (flatten) the hydraulic tilt bed trailer with
the machine in the position shown. We wanted to do that because
the two 2 x 8s were "wowing" dangerously. In the end
we were stuck and about 2 minutes after this picture was taken
the two 2 x 8's snapped like matchsticks and the machine slid
off the back of the snow covered metal topped trailer (landing
upright, whew). Luckily no one was killed but I learned then and
there that when moving heavy machinery you should be properly
prepared.
 For those who don't know what a shaper
is if you've ever seen wood being hand planed, well, this machine
does the same thing to steel. The ram holds a lathe-like tool
bit. The tool bit can be any shape you grind. The tool holder
is braced on the forward stroke and is free to flap on the back
stroke. The stroke of the ram is adjustable from 0" to 12".
The speed of the ram is adjustable from 14 to 200 strokes per
minute. The piece being worked on is clamped in the 3 axis adjustable
vise. The vise table can be cranked up or down to set the depth
of the cut. Once started the feed is engaged which automatically
traverses the vise table sideways (left or right is selectable)
so as to advance the work into the cutting. The amount the vise
advances on each stroke is also adjustable. It can do nearly anything
a milling machine can do and a few things a mill can't (like machine
a slot inside a tube say).
This machine may be heavy but when
running you can feel it in the concrete floor of the garage. I
think that's also partly because there is not a single smooth
motion made by this machine. Everything either oscillates, flaps
or jerks. It is hypnotizing to watch when it's running however.
In the end I can't say I do a lot with this machine but, like
all shapers, it does have a fantastic vise and a load of weight
to keep it from moving.
For those who don't know what a shaper
is if you've ever seen wood being hand planed, well, this machine
does the same thing to steel. The ram holds a lathe-like tool
bit. The tool bit can be any shape you grind. The tool holder
is braced on the forward stroke and is free to flap on the back
stroke. The stroke of the ram is adjustable from 0" to 12".
The speed of the ram is adjustable from 14 to 200 strokes per
minute. The piece being worked on is clamped in the 3 axis adjustable
vise. The vise table can be cranked up or down to set the depth
of the cut. Once started the feed is engaged which automatically
traverses the vise table sideways (left or right is selectable)
so as to advance the work into the cutting. The amount the vise
advances on each stroke is also adjustable. It can do nearly anything
a milling machine can do and a few things a mill can't (like machine
a slot inside a tube say).
This machine may be heavy but when
running you can feel it in the concrete floor of the garage. I
think that's also partly because there is not a single smooth
motion made by this machine. Everything either oscillates, flaps
or jerks. It is hypnotizing to watch when it's running however.
In the end I can't say I do a lot with this machine but, like
all shapers, it does have a fantastic vise and a load of weight
to keep it from moving.
Welding
 The Harris oxy-acetylene welding rig
was first welder I got. I used it for many years and made many
things with it until I purchased my MIG. The torches are now used
for things that they, only, can do. I made the cart such that
it would hold the tanks, allow the hoses to be coiled and also
to carry all the accessories tools (sparkers, glasses, tips, tip
cleaners, cutting torch etc.) as well as an assortment of rods.
The 220V MIG is a fairly recent purchase.
The MIG is now used almost exclusively and is fast becoming one
of my favorite tools just for the speed and quality of output
it can do. In conjunction with an angle grinder it excels at making
things like the forge below. Having previously used (borrowed)
an almost identical 110V MIG, I learned early on how difficult
it is to work with a regular visor (flip, flip, flip) so I got
an auto-darkening visor to go with it. I highly recommend them.
I also learned that a 220V MIG is the way to go. A 110V MIG really
pushes an electrical circuit while with 220V there is power and
welding capability to spare. Again the mobile cart is my own making.
It carries the MIG underneath, the CO2 tank behind, the AC cable
behind that. Up front is a tube to support a spare roll of wire.
The latching handle can be released allowing the cart to be pulled
like a wagon. The pull handle also carries the DC cables. Up top
is a tray for gloves, magnetic clamps, tools etc.
Two tid-bits of wisdom.
1) If you store an auto-darkening helmet
in a cool dark garage for long periods put it in a sunny window
a day before you use it. They operate off the UV but when stored
in the dark for long periods I think a capacitor discharges (these
things are batteryless) and they will be sluggish on darkening.
Your eyes will thank you.
2) Be sure to weld with ventilation.
I did some oxy-acetylene welding in the closed garage in winter
(thinking the extra heat would be nice). I was simply capping
the ends of 1 1/2" square tubing with 1/8" flats. No
rods used just moving the puddle around the edge. At the end of
the day I didn't feel good (shivering chills etc) and later found
I had given myself "metal fume fever". I would expect
this from arc welding but not the clean quiet flame of oxy-acetylene.
I won't do that again!
The Harris oxy-acetylene welding rig
was first welder I got. I used it for many years and made many
things with it until I purchased my MIG. The torches are now used
for things that they, only, can do. I made the cart such that
it would hold the tanks, allow the hoses to be coiled and also
to carry all the accessories tools (sparkers, glasses, tips, tip
cleaners, cutting torch etc.) as well as an assortment of rods.
The 220V MIG is a fairly recent purchase.
The MIG is now used almost exclusively and is fast becoming one
of my favorite tools just for the speed and quality of output
it can do. In conjunction with an angle grinder it excels at making
things like the forge below. Having previously used (borrowed)
an almost identical 110V MIG, I learned early on how difficult
it is to work with a regular visor (flip, flip, flip) so I got
an auto-darkening visor to go with it. I highly recommend them.
I also learned that a 220V MIG is the way to go. A 110V MIG really
pushes an electrical circuit while with 220V there is power and
welding capability to spare. Again the mobile cart is my own making.
It carries the MIG underneath, the CO2 tank behind, the AC cable
behind that. Up front is a tube to support a spare roll of wire.
The latching handle can be released allowing the cart to be pulled
like a wagon. The pull handle also carries the DC cables. Up top
is a tray for gloves, magnetic clamps, tools etc.
Two tid-bits of wisdom.
1) If you store an auto-darkening helmet
in a cool dark garage for long periods put it in a sunny window
a day before you use it. They operate off the UV but when stored
in the dark for long periods I think a capacitor discharges (these
things are batteryless) and they will be sluggish on darkening.
Your eyes will thank you.
2) Be sure to weld with ventilation.
I did some oxy-acetylene welding in the closed garage in winter
(thinking the extra heat would be nice). I was simply capping
the ends of 1 1/2" square tubing with 1/8" flats. No
rods used just moving the puddle around the edge. At the end of
the day I didn't feel good (shivering chills etc) and later found
I had given myself "metal fume fever". I would expect
this from arc welding but not the clean quiet flame of oxy-acetylene.
I won't do that again!
Sanding
 I got this item on sale from Busy Bee.
I got it because I found I was using my woodworking belt sander
more and more for doing finish work on steel bits I was welding
up. The basic machine is not too bad but there were serious issues
with clearances between tables and belt/discs. The clearances
were too large (despite minimum adjustment) and were dangerous
as a piece could be grabbed by the belt or disc and flip up wedging
your fingers between the part and the moving abrasive. This happened
once before I remedied the situation. Youch! The solution was
to machine the castings at several critical points as they were
preventing the tables from moving forward enough. Both tables
can now be adjusted full tight against the belts however about
1/16" is what I set it to.
It originally came with a stamped sheet
metal stand which I found light duty and more importantly non-mobile.
Instead, I made the mobile base for it which includes a tray for
holding parts being worked on. If you leave the parts on the table
by themselves they will tend to vibrate off and fall to the ground.
The table solves that and allows the work surfaces to be clear.
It is shown in the picture front of the belt but you can see similar
pins on the stand in front of the disc. The tray also has holes
(in tabs) allowing it to hang down vertically out of the way when
not in use. The nice large casters make it easy to move around.
Having done all the above it is now
a wonderful machine. I wonder now how I ever got by without one
before!
I got this item on sale from Busy Bee.
I got it because I found I was using my woodworking belt sander
more and more for doing finish work on steel bits I was welding
up. The basic machine is not too bad but there were serious issues
with clearances between tables and belt/discs. The clearances
were too large (despite minimum adjustment) and were dangerous
as a piece could be grabbed by the belt or disc and flip up wedging
your fingers between the part and the moving abrasive. This happened
once before I remedied the situation. Youch! The solution was
to machine the castings at several critical points as they were
preventing the tables from moving forward enough. Both tables
can now be adjusted full tight against the belts however about
1/16" is what I set it to.
It originally came with a stamped sheet
metal stand which I found light duty and more importantly non-mobile.
Instead, I made the mobile base for it which includes a tray for
holding parts being worked on. If you leave the parts on the table
by themselves they will tend to vibrate off and fall to the ground.
The table solves that and allows the work surfaces to be clear.
It is shown in the picture front of the belt but you can see similar
pins on the stand in front of the disc. The tray also has holes
(in tabs) allowing it to hang down vertically out of the way when
not in use. The nice large casters make it easy to move around.
Having done all the above it is now
a wonderful machine. I wonder now how I ever got by without one
before!
Forge & Anvil

 Here is my forge. When you need serious,
un-Godly amounts of heat you fire this thing up. This is my own
creation. It has a large Centaur forge PB50 blower which I set
up to work off a foot pedal switch. There is also an air gate
for instant heat control. I have hammer racks on the front and
right and tong a tong rack on the left. The central side wall
is removable front and back to allow heating of long objects in
the forge. There is a bolt-on attachment on the ground between
the forge and the anvil for holding a propane tank. Propane tank?!
I live in suburbia and have only fired up this forge at home once.
It puts out a fair amount of smoke until you coke up the coal.
I'm very worried the fire department will pay me a visit (this
did happen once on an unrelated incident). Anyway the thought
is I might add a swivel arm with a propane forge on top which
would allow me to use this at home more often.
The forged dual horned anvil is originally
from the Quebec city area (I'm told) from around 1750. It was
in bad "saddle back" shape (even a torch cut into it)
so I had some Ranomatic BBG hardface put down on it until it was
built back up. I bought a 7" grinder and cup wheels to true
up the resurfaced top. It came out quite well. It has both a round
and square horn, a pritchel hole at each end and a hardy hole
at the round horn end
Leaning on the left side of the forge
is one of my leg vises. I actually have several of these. I have
yet to mount this to the forge.
The Hesperer cone anvil on the left
was a purchase from north of Toronto. My intent was to use it
to true up forged iron clock wheels. In fact my whole
reason for getting into blacksmithing was to create a forged iron
clock.
Here is my forge. When you need serious,
un-Godly amounts of heat you fire this thing up. This is my own
creation. It has a large Centaur forge PB50 blower which I set
up to work off a foot pedal switch. There is also an air gate
for instant heat control. I have hammer racks on the front and
right and tong a tong rack on the left. The central side wall
is removable front and back to allow heating of long objects in
the forge. There is a bolt-on attachment on the ground between
the forge and the anvil for holding a propane tank. Propane tank?!
I live in suburbia and have only fired up this forge at home once.
It puts out a fair amount of smoke until you coke up the coal.
I'm very worried the fire department will pay me a visit (this
did happen once on an unrelated incident). Anyway the thought
is I might add a swivel arm with a propane forge on top which
would allow me to use this at home more often.
The forged dual horned anvil is originally
from the Quebec city area (I'm told) from around 1750. It was
in bad "saddle back" shape (even a torch cut into it)
so I had some Ranomatic BBG hardface put down on it until it was
built back up. I bought a 7" grinder and cup wheels to true
up the resurfaced top. It came out quite well. It has both a round
and square horn, a pritchel hole at each end and a hardy hole
at the round horn end
Leaning on the left side of the forge
is one of my leg vises. I actually have several of these. I have
yet to mount this to the forge.
The Hesperer cone anvil on the left
was a purchase from north of Toronto. My intent was to use it
to true up forged iron clock wheels. In fact my whole
reason for getting into blacksmithing was to create a forged iron
clock.
30 Ton Press
 I got this item on a special sale recently
at Princess Auto. The deal was just too good to pass up even though
I don't have a lot of jobs planned for it. I do need to press
in a pair of bearings and I could likely make some "V"
blocks etc to bend steel. Perhaps with a die I could use it for
bending tubes as well. In my experience it is the kind of machine
you don't use a lot but when you do need one nothing else will
do. We'll see. I'll edit this part as time progresses. It's been
placed in my basement as there is currently no more space in the
garage. When it's assembled I'll update the picture too.
Well that's more or less it. What?
No air compressor? Hmmmm.......
I got this item on a special sale recently
at Princess Auto. The deal was just too good to pass up even though
I don't have a lot of jobs planned for it. I do need to press
in a pair of bearings and I could likely make some "V"
blocks etc to bend steel. Perhaps with a die I could use it for
bending tubes as well. In my experience it is the kind of machine
you don't use a lot but when you do need one nothing else will
do. We'll see. I'll edit this part as time progresses. It's been
placed in my basement as there is currently no more space in the
garage. When it's assembled I'll update the picture too.
Well that's more or less it. What?
No air compressor? Hmmmm.......
Back to 
Back 


